Yesterday I had one of those days where a layout just falls together perfectly and it ends up being an instant favourite. I decided to capture my creative process, so please enjoy!
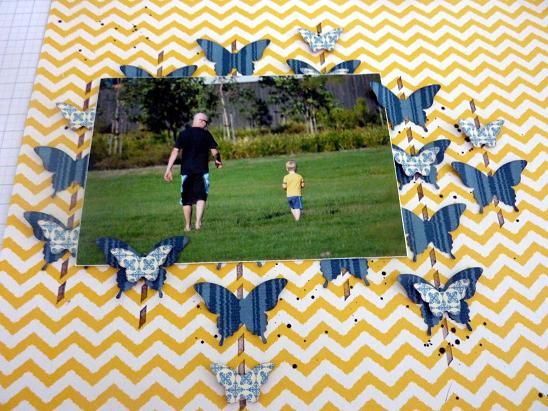
I started with the yellow chevron paper from the Parkers Patterns DSP, and used the Stampin'Spritzer (126185) with some of the choc chip ink from the reinker(101065) to create splatters across my page. I unscrewed the lid and tapped the end of the nozzle over the page to acheive the best looking splatters. I made the splatters from the top left to the bottom right to give some movement to the page.
I punched out a bunch of large butterflys from the blue stripe paper, and smaller butterflys from the Marina Mist patterned paper.
After my paper was dry from the ink splats, I laid my photo and butterflys on the page and moved them around till I thought they were in the right position to make a nice pattern.
I then used the long stamp from the Sent with Love stamp set and choc chip ink and stamped lines where the butterflys would sit on top. I extended the lines a little above and below where the top and last ones on each line would go. I did this freehand, but you could add a small pencil mark where you want the top and bottom to start and finish. You could also use the Stamp-a-ma-jig to ensure your lines are straight.
I inked the edges of all my punched butterflys with choc chip using the wedge of a Stamping Sponge (101610).
I adhered all the butterflys back in their spot, and used dimensionals (104430) to pop up the little butterflys. Before I adhered each butterfly I rubbed it's little wings up to give them some more dimension. I left off one of the bottom left butterflys where I knew I wanted one to put on top of the photo.
I sanded the edge of my photo using the Stampin Sanding System (129367).This gives the photo a nice thin outline to enhance it.
I adhered the photo to my layout using dimensionals, and added the last 2 butterflies on the bottom left and poked one wing in the top right over the photo as well.
I added some random letters from my stash for my title, and stamped the little heart shape (minus the plane) from the Sent With Love stamp set to finish off the title.
There you have it - the complete layout. It came together surprisingly quick and I just love the end result. Why not challenge yourself to use some punches and stamps to create your background on your next layout or card!
If you would like to order any of the products I used on this layout, please
contact me here, or you can order
online here.
Don't forget about Stampin'Ups! great promotions this month - host your own workshop and recieve bonus $$$s! You can find out more info here.


No comments:
Post a Comment